How to use TestDisk
Software to recover partitions
Free software that can recover partitions by modifying the boot sector is "TestDisk".
Also the partitions that have not be able to recognize suddenly can possible to recover by TestDisk.
This is an image of running TestDisk.
TestDisk can rewrite the partition table as searching the partitions trace remain in the hard drive.
It seems little bit difficult, but operating TestDisk itself is easy.
Comparing with using sector editor, it is low-risk.
TestDisk rewrites MBR.
I mean it is possible to restore by TestDisk even the PC which have not boot in MBR trouble.
Conversely, be aware of Windows may not boot if TestDisk is operated in a wrong way.
And TestDisk is not software for recover the data.
It is software for rewrite the data correctly.
*It have been added "Undelete" function from version6.10. and able to recover a part of the file.
If you have necessary data in the hard drive, backup it to the highest priority.
There are a wide range of circumstances of using TestDisk.
It is impossible to cover all cases.
It only means that, the most happen potential case are written here.
In particular, here is about the case of the Windows cannot recognize the partitions due to failure in the partition table.
This case includes in accidental deletion of the partitions.
Therefore TestDisk is not only following this process.
You have to think and act with checking on the issue at hand.
This page should be hints for the solution.
Starting TestDisk
You get TestDisk from below.
| Top page | CGSecurity |
|---|---|
| Download page | TestDisk Download |
DOS version, Windows version, Linux version - there are various versions for various OSs, so choose fit one for your OS.
However, that means the partition table have some troubles, Windows might not boot itself.
On this case, need to start DOS or Linux or appropriate OS from CD or floppy disk, then start TestDisk which is DOS version or Linux version.
But instead of these processes, it is easy to use Ultimate Boot CD since these processes are so troublesome.
Following, I will explain based on TestDisk for Windows.
After started TestDisk, you can use these processes for other platforms.
The downloaded file of TestDisk is compressed by ZIP, so use any unzip software and unzip it.
Then the file will be extracted in folder named "testdisk-xxx" (xxx are version numbers).
For example, the case of Windows version, an executable file of TestDisk named "testdisk_win.exe" should exist there.
Hard drive of the PC for test was set following conditions.
- "D drive" was just created the partition and unformatted.
- "E drive" was created the partition, then NTFS formatted.
- The last extended partition was recovery area for software called "True Image".
And deleted above all partitions, then started test.
From now, actually executing TestDisk.
Here is for Windows, so "testdisk_win" will be executed.
Don't mind operationg with only keyboard for TestDisk.
Because there is no substitute for exellent function like TestDisk.
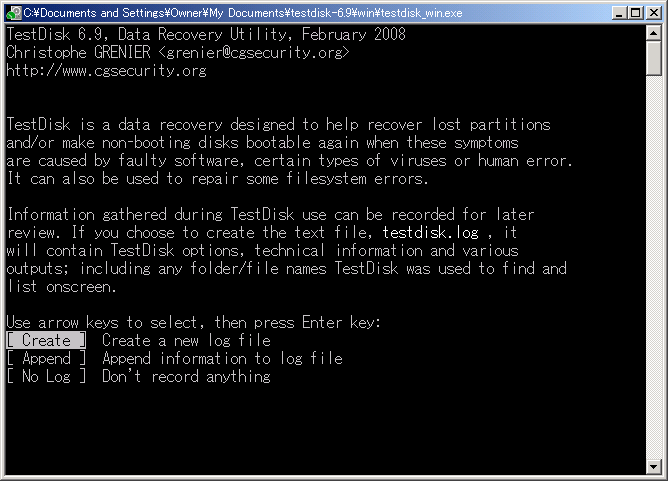
At first, TestDisk will ask whether TestDisk operation logs saves as a file or not.
Choose one as you like.
I always choose "No Log".
Press "Enter" to proceed.
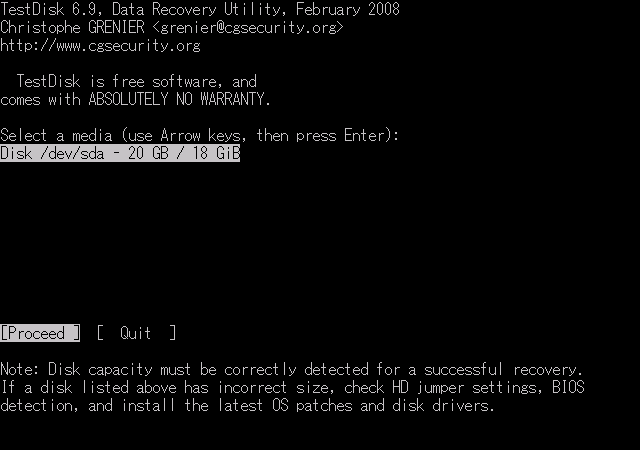
Choose the hard drive of target restoration by TestDisk with using up/down arrow keys to select "Proceed".

Choose the partition table type.
Since Windows version is explained here, choose "Intel".
But in the case of you use GPT for example the hard drive over 2TB, choose "EFI GPT".
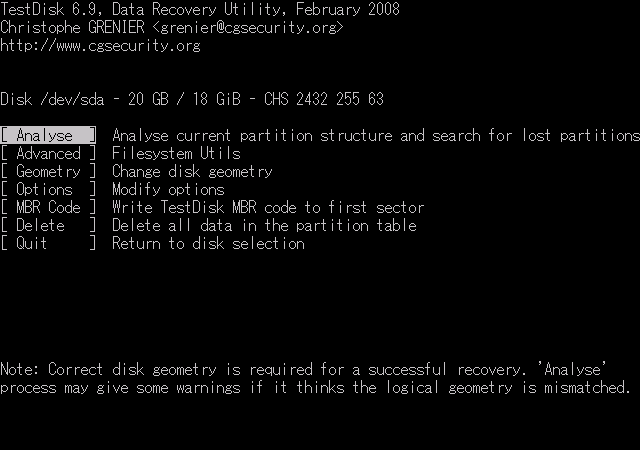
This is a TestDisk main menu.
Only necessary parts will be explained roughly here, because TestDisk has lot of functions and hard to understand to explain about the whole of it.
| Analyse | Analysing the information of the partitions. Using mainly. |
|---|---|
| Advanced | Repairing the boot sector of each partition (PBR) and MFT. |
| Geomerry | Changing value of CHS and sector size. |
| Options | Operation options for TestDisk itself. |
| MBR Code | Rewriting MBR code (Bootstrap loader) by TestDisk. |
| Delete | Deleting and filling in the partition table with "0". |
| Quit | Return. |
If you don't understand them basically, don't operate too much except "Analyse".
I wrote as opening, if you don't understand operations of TestDisk properly, it is in danger of the new problems.
As TestDisk rewriting parts of the base of data in hard drive quickly, so ideal is essentially using after you know exactly about the structure of hard drive and booting system.
But in here, as the title, how to use TestDisk will be explained mainly.
Choose "Analyse".
Quick Search
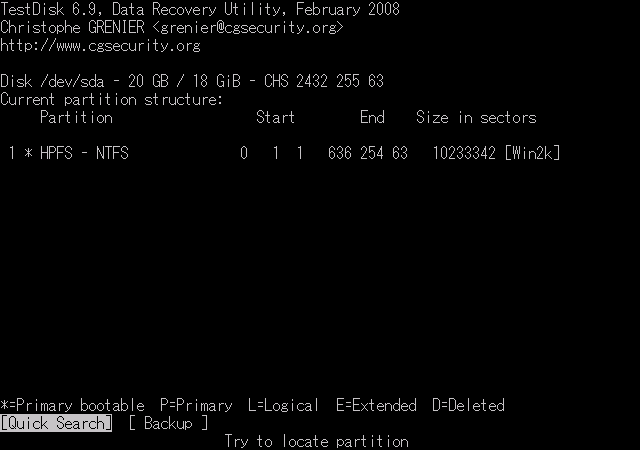
If choose "Analyse" at main menu, the information of current partitions are displayed that is before TestDisk operated .
Choose "Quick Search" now.
For your information, if choosing "Backup", "backup.log" file will be created at the same place as executable file of TestDisk, then preserving the current information and proceeding.
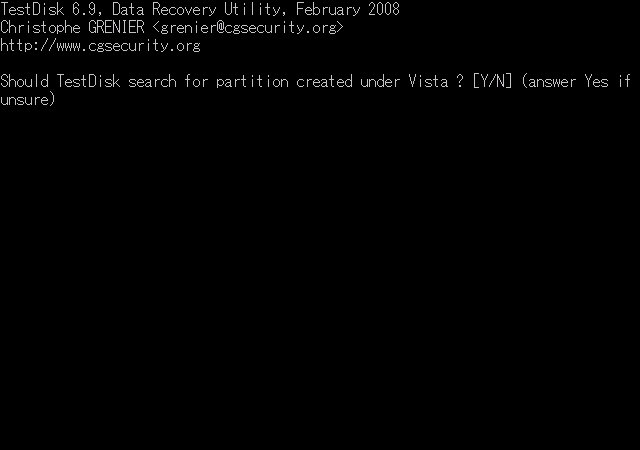
TestDisk displays whether these partitions were created under Vista or later.
Press "Y" or "N" key to answer it.
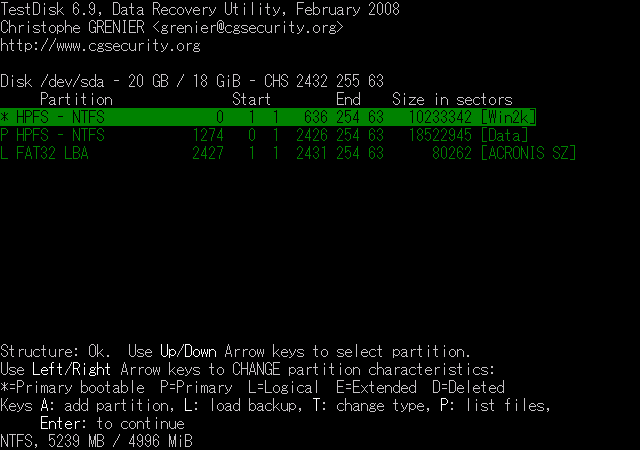
After scan is over, the partitions of results researching by "Quick Search" will be displayed.
It is alike in appearance but quite different in previous display.
Look at with attention.
If data integrity is match, each partition will be displayed in green.
Below is the meaning of marks on the left side of partitions.
| * | Active primary partition (That means system partition). |
|---|---|
| P | Primary partition. |
| L | Logical drive. |
| E | Extended partition. |
| D | Partition that scheduled for removal. |
If choosing an arbitrary partition here and pressing right/left arrow key, you can change the partition type.
But it is impossible to set inconsistency.
That's why, the major reason for TestDisk is thought that easy and safe.
If finding necessery partition, change it as you think proper.
In the case sooner after partition is deleted, mostly it will find easily by "Quick Search".
And it will be added automatically.
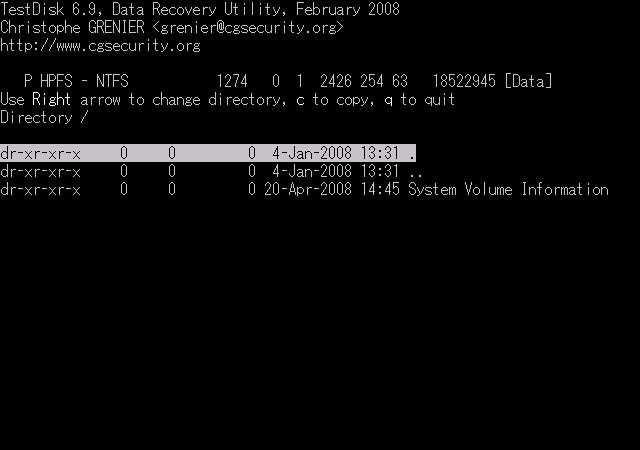
One way to know whether partition is valid or not, as choose an arbitrary partition and press "P" key, so file list will be displayed.
The image above is partition just formatted, that's why there is no "Recycle Bin" though...
As you see it, there is nothing.
Do confirm.
For your action, when exiting the list screen, press "Q" key.
Conversely, it is thought that the partition are probably invalid if the file cannot indicated.
After setting the partitions through above operations as you like, press "Enter" key and proceed.
Deeper Search
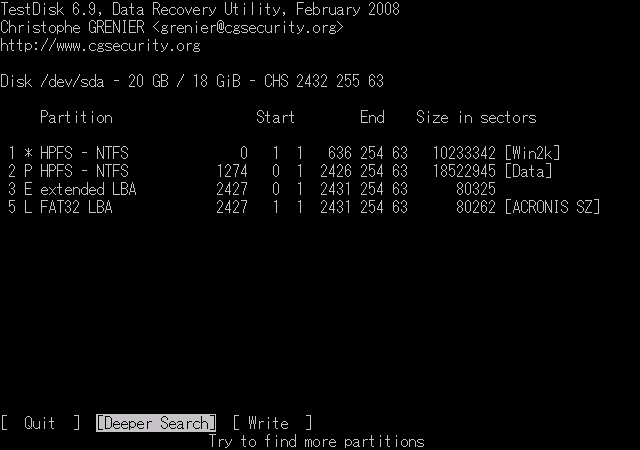
If necessary partitions have not been displayed yet in this point, choose "Deeper Search" and continue the operations.
It take a little while to do, but it will research the trace of partitions across the entire hard drive.
If there are not any problems the structures of partitions already displayed, proceed to content of "Write".
Also, if necessary partitions will be found, you can choose "Stop" and stopping the scanning though it is in execution.
Especially, in the case partition exists only one, necessery information should be concentrated in the top of the disk.
It might take an unnecessarily long time if executing "Deeper Search" by high capacity hard drive.
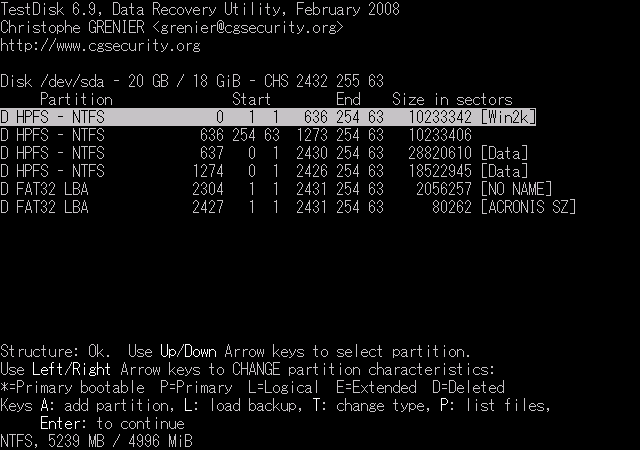
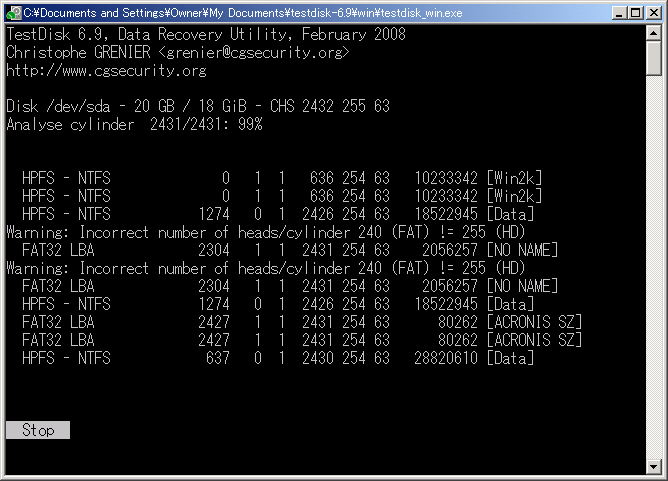
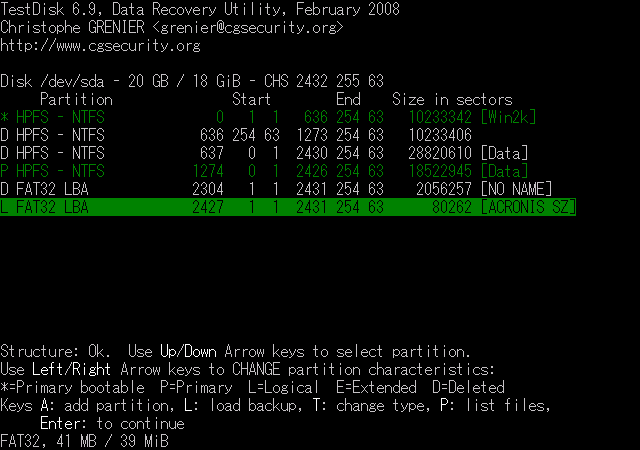
This is a result of "Deeper Search".
The candidate partitions have increased.
Each partition is treated as a deletion once, because there are too much choices.
Rest assured that there are not have been deleted.
How to operate and way to viewing the display are same as "Quick Search".
Change partition type as you like with using right/left arrow key.
And press "P" key to try to confirm the file list can be displayed.
Especially, the hard drive that has various separated partitions records needs to choose the partition used by various clues because many candidate partitions are detected by "Deeper Search".
Conversely, if you have not changed the partitions from the time of purchase, it is comparatively easy to decide the type because it will not appear many lines uselessly like above image.
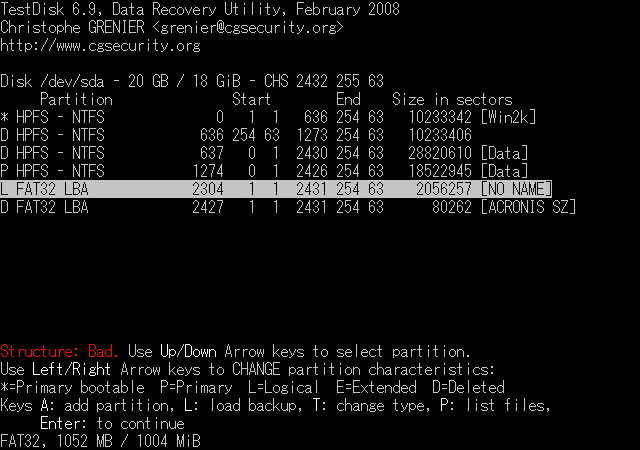
I tried inconsistency setting on purpose.
Then be gotten the warning "Structure: Bad.".
If there are many candidates, it is an unexpectedly nice function.
After choosing recovery partition, press "Enter" key.
Write
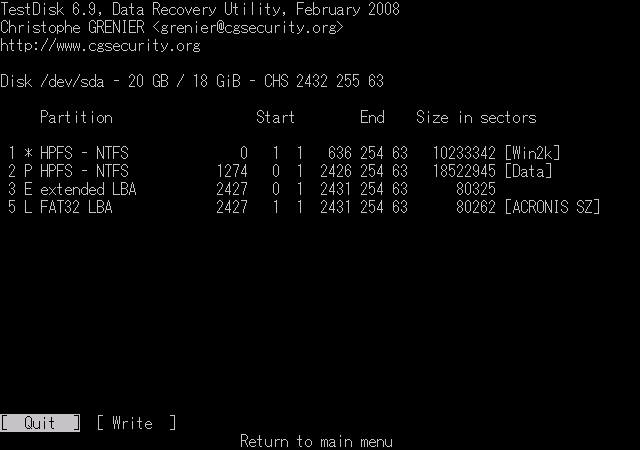
The list of the partitions set by TestDisk are displayed.
Then, confirm full well here.
After choosing "Write", it will start to write partition informations that is currently displayed on the screen in partition table.

Here is final confirmation.
When press "Y" key, it will start to write in the partition table finally.
That's right, in fact, TestDisk has not changed at all for hard drive so far.
When you think "It's dangerous.", you can stop it anytime.
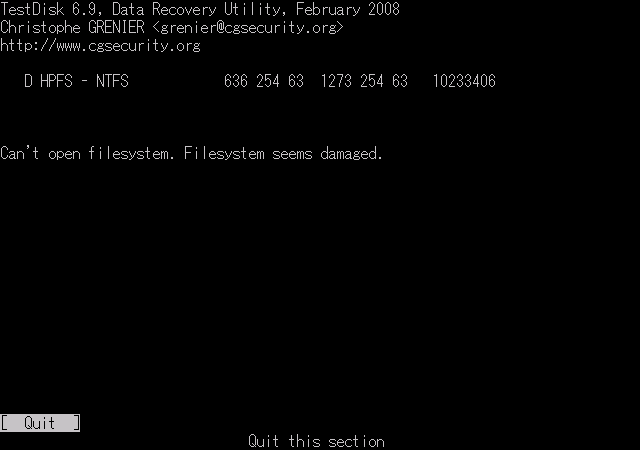
And in some cases, a different screen will be displayed here.
It means that partition cannot be recovered as it is because of PBR failure.
But it is possible to repair the PBR by TestDisk.
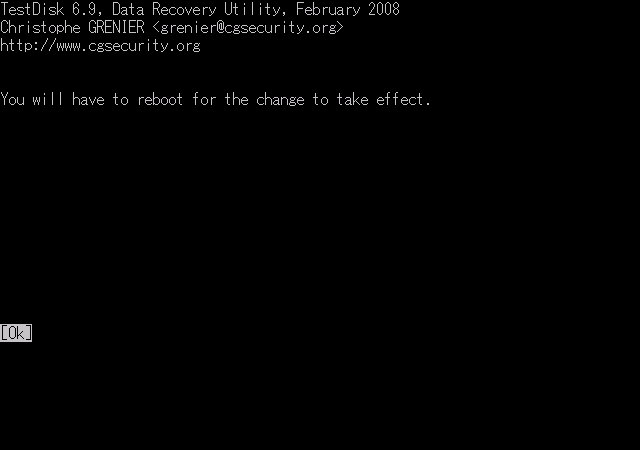
The message prompting to reboot is displayed and you are done.
Close TestDisk and reboot, then try to confirm the running.
In this case, partitions that were able to use have all restored by TestDisk.
"True Image" that boot from recovery area was also normal working.
But there were a partition which was not found by TestDisk.
Why was it not found?
Because "D drive" have not formatted yet, the PBR relates to this partition have never made.
So TestDisk tries to desparate search for wreck of boot sector, it definitely will not be found because non-existence.
As "unformatted" = "never used", so actually it is unimportant.
Only create it again.
In case of it cannot restore
The operations so far, sometimes partitions are able to be confirmed by TestDisk but it is on closed access from Windows though choosing "Write".
Then, a strong recommendation to you to confirm PBR.
Although TestDisk have finished without errors, it have not always normal structure.
Especially, since TestDisk often uses for storage of suspicious behavior, TestDisk itself might falsely recognize a storage.
Eventually, having need to estimate the situation and decide it in person.
In contrast, if "Read error" is displayed and partitions cannot be detected due to not reading the sector is not useless to resolve the problem by using TestDisk.